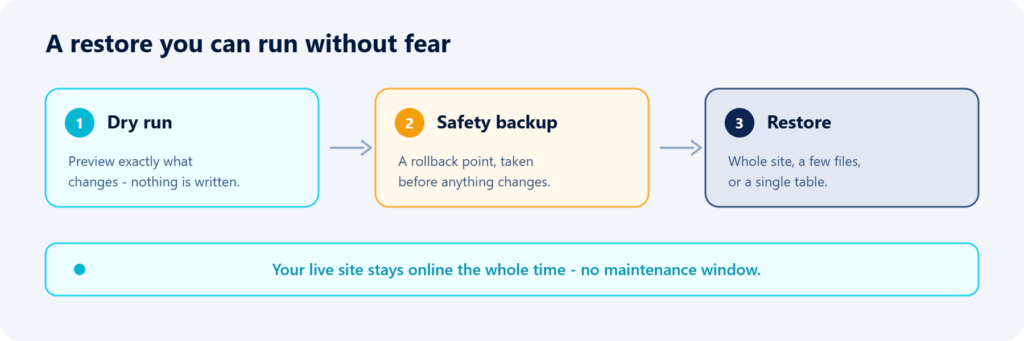
Moving a WordPress site by hand takes a database export, a file copy, an import, a wp-config.php edit, and an address rewrite that breaks saved settings if you do it in a text editor. Our manual migration guide walks through each of those steps. With Backvera, the move starts from a backup you already have: you pick a snapshot, tell Backvera where the site should live, and the clone copies the files and the database to the new server and rewrites the address on the way.
This guide covers a move to a new domain, a move to a new host on the same domain, and a test run on a staging copy first. Each step uses the screens in your Backvera dashboard, and the help center has a short reference for each one.
What a clone does
A clone copies one snapshot to a different place. On the way, it does five things:
- It reads from your backup, not from your old server. The files and the database come from the snapshot in Backvera Cloud, so the move puts no load on the old host, and it still works if that host is slow or offline.
- It rewrites the address. Every copy of the old address in the database changes to the new one, including inside serialized settings, where a text replace would break widgets, menus and theme options.
- It gives the copy its own security keys. On an empty server, Backvera writes a new wp-config.php with the database details you enter and freshly generated keys and salts. If WordPress is already installed there, the copy keeps that install’s database details and keys.
- It handles symlinks. Links that point inside your site are recreated. Links that point outside it are listed after the clone, so you can give each one a target on the new server or leave it out.
- It leaves the original alone. Your live site keeps running on the old host until you change DNS.
Cloning is included on the Starter, Business and Scale plans. Staging copies, used for the test run below, come with Business and Scale.
Before you start
- A connected site with a finished backup. If the site is not connected yet, the quickstart gets you to a first backup.
- A place on the new host. You need a folder for the site, an empty database with its own user, and an SFTP login. FTPS and FTP work too. WordPress does not need to be installed there.
- The new address has to reach the new server. Backvera connects to the destination at the address you give it, over HTTPS when the address starts with https://, and checks the certificate. The domain has to point at the new host, and the host needs a valid certificate for it, before the clone starts. For a new domain, set that up first. To keep the same domain, follow the order in the section on keeping the same domain below.
- A PHP version at least as new as the old host’s. If you are not sure the site runs on a newer PHP, test it on a staging copy first.
Step 1: Take a fresh backup
Open the site in your dashboard and click Backup now. Add a note such as “Before move to new host” so the snapshot is easy to find, then click Start backup. Backvera backs up only what changed since the last backup, so this run is usually short.
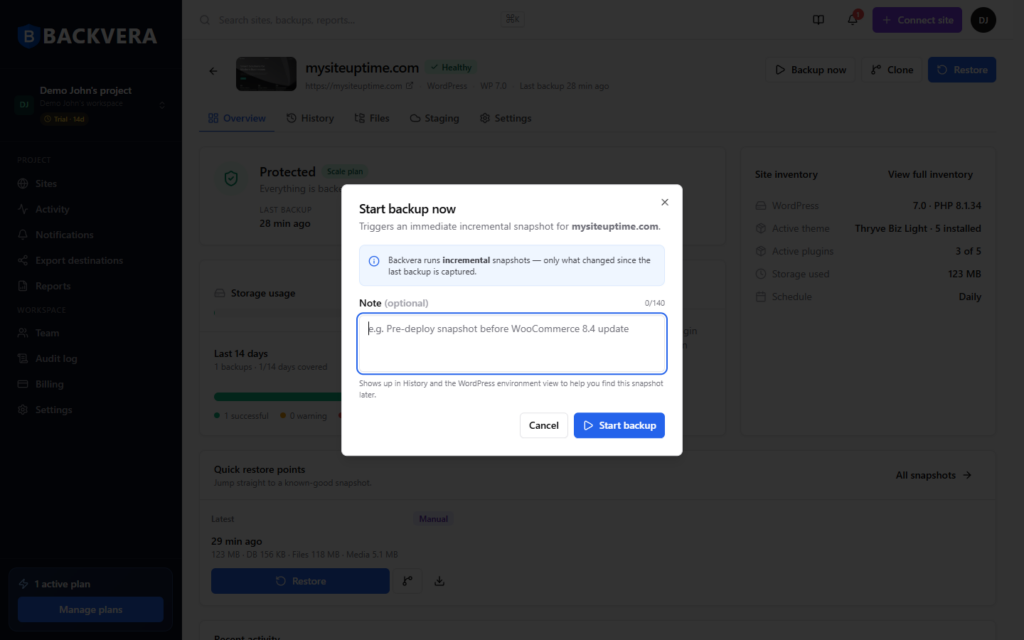
Anything written to the old site after this backup, such as a new order, comment or form entry, will not be in the copy. On a shop, pick a quiet hour for the move.
Step 2: Open the clone screen
Click Clone at the top of the site page, or click Restore and choose Clone to new URL. Then pick the snapshot from step 1 in the snapshot list.
Step 3: Choose where the copy goes
Under Clone destination there are three tabs.
A new server: FTP / FTPS / SFTP
Use this tab for a host where nothing is set up yet.
- Choose the protocol. SFTP is recommended; FTPS and FTP are there for hosts that offer nothing else.
- Enter the host, port, username and password. With SFTP you can use an SSH key instead of a password.
- Target path is the folder on the new server that the web server serves the site from, for example /var/www/example.com or /home/account/public_html.
- Target URL is the address the site will live at, such as https://www.example.net. Backvera rewrites the database to this address.
- For the database, either tick the option to reuse the destination’s existing wp-config.php, which only applies when WordPress is already installed at the target path, or enter the host, port, user, password and name of the empty database you created.
- Click Test connection, then Test MySQL connection. The first test checks that Backvera can log in and write to the target path. The second runs on the new server itself, through the target URL, and checks the database login. When both pass, the clone will reach the destination the same way.
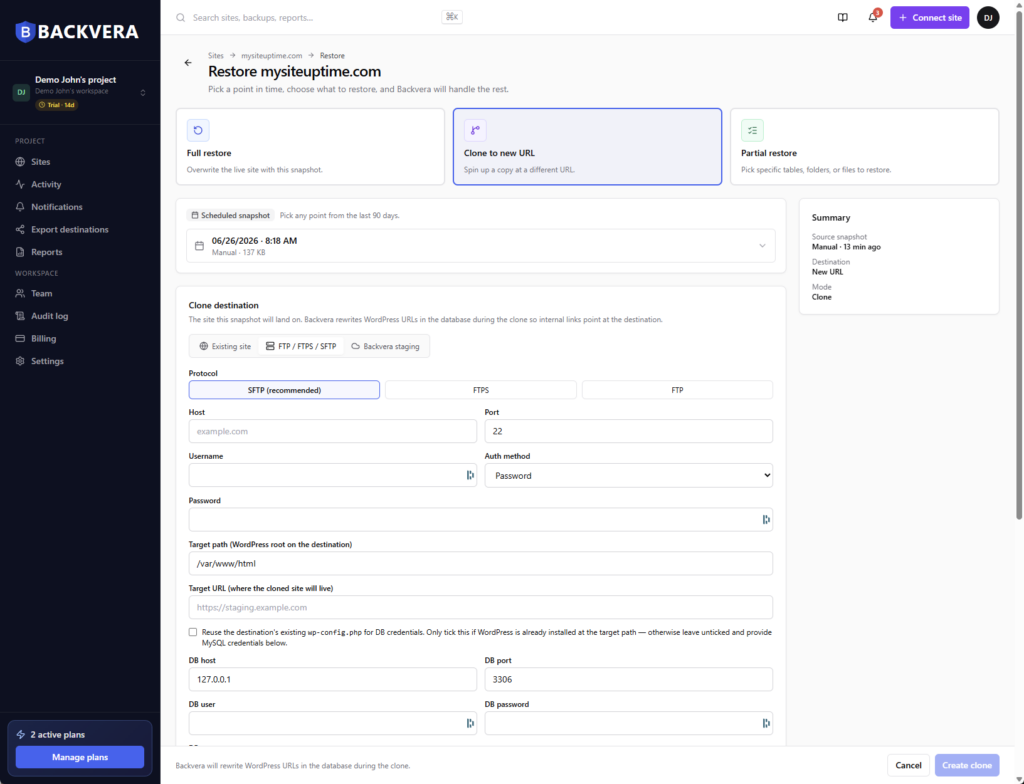
Tick Add to my Backvera dashboard if you want to keep backing up the site in its new home. When the clone finishes, Backvera adds the destination to your project as its own site.
A site already in Backvera: Existing site
If you already installed WordPress on the new host and connected it to Backvera, pick it from the list. The clone replaces that site’s content with the snapshot and rewrites the address to that site’s URL, and the destination stays connected to your dashboard. Because this overwrites a live site, Backvera asks you to confirm before it starts.
A test run first: Backvera staging
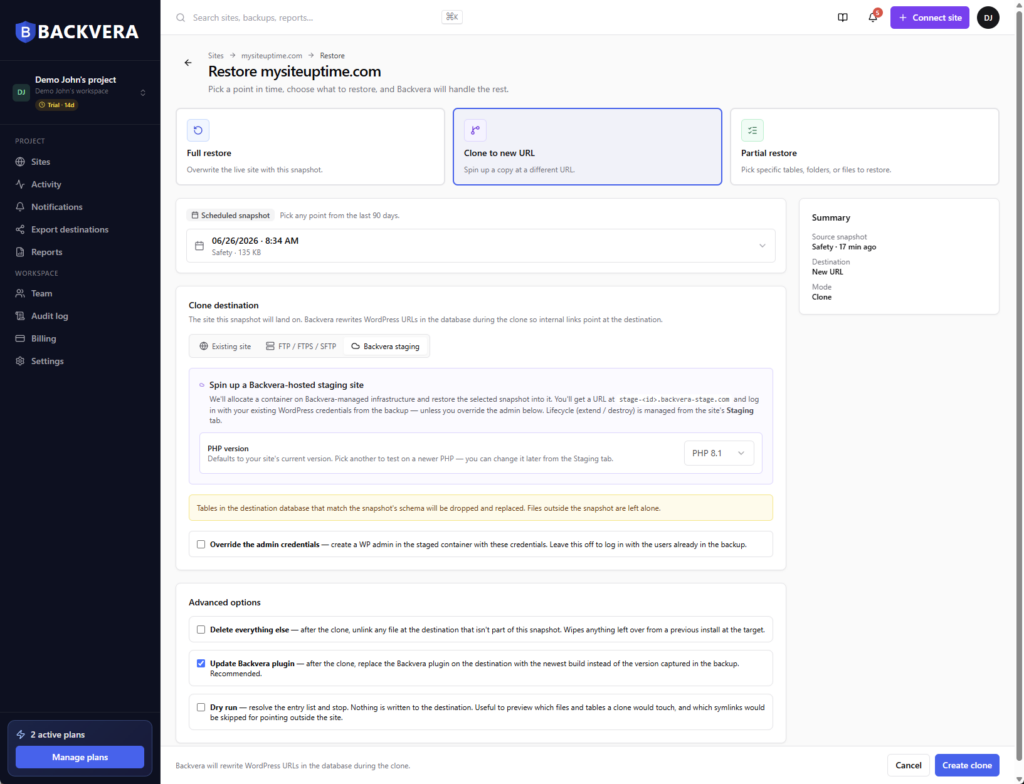
On Business and Scale, the Backvera staging tab builds a copy on Backvera’s own servers at its own stage address, with a password prompt in front of it by default. You choose the PHP version it runs. Use it to check the site on the new host’s PHP version, or to show the copy to a client, before you touch the new host. Spin up a staging site covers the rest.
Step 4: Check the options and start the clone
Before you start, read the notice under the destination. Tables in the destination database that match the snapshot are dropped and replaced, and files outside the snapshot are left alone, so use a database that holds nothing else.
Under Advanced options:
- Delete everything else removes files at the destination that are not in the snapshot, such as a starter page the host put in the folder or files from an earlier install. Leave it off if the target folder holds anything you want to keep.
- Update Backvera plugin installs the newest build of the plugin on the copy instead of the version in the backup. It is on by default, and we recommend leaving it on.
- Dry run lists the files and tables the clone would write, and the symlinks it would skip, without writing anything. Run it once if the site has an unusual layout.
You can also tick Override the first admin’s credentials to give the first administrator on the copy a new username and password, for example when you hand the new site to a developer and do not want to share your own login.
Click Create clone. Progress shows on screen, and the clone also appears in the Activity feed, so you can leave the page and come back.
Keeping the same domain on a new host
When the domain stays the same, it still points at the old server while you prepare the new one. Backvera connects to the destination at its target URL, so a clone with your real domain can only run once the domain points at the new host. Do it in this order to keep the time between the DNS change and a working site short:
- A day ahead, lower the DNS TTL of the domain’s A and AAAA records to 300 seconds, so the change later takes effect within minutes.
- Rehearse. Clone the snapshot to a Backvera staging copy, or to a temporary address on the new host with its own folder and database. Click through the copy and fix anything that breaks, such as a missing PHP extension, before the real move. Treat the rehearsal copy as a test only, because its database uses the temporary address.
- At a quiet hour, take a fresh backup as in step 1.
- Point the domain at the new server. Change the A record, and the AAAA record if you use IPv6, to the new server’s IP address. Leave the MX and other mail records alone unless your email moves too.
- Wait until the domain resolves to the new server.
nslookup example.comshows the address your computer gets. Then check that the new host has issued an HTTPS certificate for the domain; many hosts do it on their own once the domain points at them. - Run the clone with your real domain as the target URL. Click Test MySQL connection first: when it passes, the domain reaches the new server.
Between the DNS change and the end of the clone, visitors who already reach the new server see whatever the host serves from the empty folder, usually a placeholder page. After a rehearsal, that window lasts about as long as one clone.
Moving to a new domain
- Point the new domain at the new host and make sure the host serves it over HTTPS.
- Clone with the new domain as the target URL. Backvera rewrites the old address throughout the database.
- Keep the old domain registered and redirect it, so that each old URL answers with a permanent (301) redirect to the same path on the new domain. The manual migration guide has the .htaccess rules. If the site is in Google Search Console, use its Change of Address tool from the old domain’s property.
The old site keeps running on the old domain until you add the redirect, so you can compare the two side by side first.
After the move
- Check the new site. Log in to wp-admin with the same users as before, unless you set an override. Open a few posts and pages, check images and forms, and in Settings > Permalinks click Save Changes once. Clear any page cache or CDN in front of the new host.
- Fix skipped symlinks. If the site uses symlinks that point outside it, the result screen lists them with a field for a new target. Fill in the ones you need and Backvera creates them. How symlinks are handled explains the details.
- Back up the new site. If you ticked Add to my Backvera dashboard, the new site is already in your project. If not, connect it from the dashboard like any other site.
- Move the plan. Plans are licences you can reassign. On the Billing page, unassign the old site’s plan and assign it to the new site. Then disconnect or delete the old site: disconnecting stops backups and keeps every snapshot, and deleting starts a 30-day grace period before its snapshots are removed. See Disconnect, uninstall, or delete a site.
- Keep the old host for a week before you cancel it, in case you want to compare something.
Moving one subsite out of a multisite network
On a multisite network, which Business and Scale support, the site’s Network tab can clone a single subsite out as its own standalone WordPress site on a new domain or host. Backvera carries over your network administrators so you can log in, replaces the network rewrite rules with standard single-site ones, fixes media links and resets permalinks. Back up a WordPress Multisite network has the steps.
Rehearse your next move
A clone runs from a backup that already exists, so you can rehearse a move on a staging copy or a temporary address as many times as you need without touching the live site.
Move a site with Backvera.
Start a 14-day trial with no card, connect the site you want to move, and run your first clone as soon as the first backup finishes. Trials include cloning and staging, and storage is included.
Start a 14-day trial, or read Clone or migrate a site to a new location in the help center.